Microcontrollers & Logic
Introduction
Microcontrollers are a way of condensing logic in Stormworks, they are programable processors that can be custom made to fulfil a wide array of tasks and use cases within Stormworks using Lua blocks, Logic Gates, mathematical functions, etc. With microcontrollers (MCs) you can use a variety of logic gates that are not accessible through the traditional parts menu within the vehicle builder, as a result not only are MCs good at condensing logic, but also give the player access to a wider variety of options and paths to take in order to fulfil the required task.
This page will go over how to create a microcontroller, and go through a majority of the logic blocks that are found within Stormworks and show you examples on how they are used with images.
Creating a Microcontroller

Properties Initial setup.

Step 1 in any MC is creating one. At the top of your vehicle editor you will see 8 tabs, you want to select the final one labelled "Microcontroller Editor". Once in this mode, it will default you to the "Design" settings and you will see 3 tabs; "Properties", "Logic" and "Symbol".
- Properties tab is where you will define a name and description for your microcontroller; this is what it will appear as in your parts menu. You also will have the opportunity to define the size of your microcontroller; with the smallest scale being
1 Block × 1 Block × 1 Blockand the maximum being6 Block × 6 Block × 1 Block. It is important to select the correct size however this can be edited at any time, you can make it as large as possible and condense later. - Logic tab is where you will set the various logic nodes.
- Symbol Tab is where you will setup the symbol that will appear in the parts menu for your microcontroller. This is done by toggling each pixel from dark grey to light grey in a
16 × 16grid.
Logic Nodes
Step 2 in creating a microcontroller is assigning your Logic Nodes. To do this, go to the "Logic" tab in the microcontroller designer and select the large blue addition symbol which is labelled "Add Node" when you hover your mouse over it. Once done, you will see a red on/off input node appear in the list, as well as a red circle appear on the microcontroller in the bottom left slot. From here, we can choose the kind of node, and whether or not we want the node to be an input variable (going into the microcontroller) or an output variable (leaving the microcontroller). The different forms of logic nodes are;
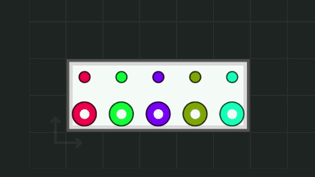
Node Layering on/off- Alternatively referred to as Boolean nodes; this is your basic binary On or Off logic transfer node. The default colouring is Rednumber- This node will transfer a numerical value. The default colouring is Green.composite- This is your composite channel node; containing 32 channels for bothon/offand/ornumberdata, Meaning it is possible to pass 64 different channels of information through this single node, provided 32 differenton/offvalues and 32 differentnumbervalues. The default colouring is Purple.video- This node will allow you to output a video to various components (e.g. monitor, HUD, etc) or input from a Camera component to be modified (e.g. adding a sight or data to a HUD). The default colouring is Light Blue.audio- This node will allow you to input and manipulate audio from microphones. The default colouring is Khaki Green.

Following game version v1.15.10 - The Microcontroller Layers Update[1] in January of 2026 you are now able to layer logic nodes over one-another allowing for more compact microcontrollers.
- ↑ Steam Announcement Page for update.https://store.steampowered.com/news/app/573090/view/507351614918492485